USB Driver v4.4 Installation Instructions
System Requirements
Windows Vista or 7 (64-bit)?
Administrative privileges on your computer (please consult your system administrator for details)
Intel Core i3/i5/i7 processor...
If your computer is running 32-bit Windows?, we recommend that you install version 4.16 instead.
Driver version 4.4 is intended for use on computers which:
- Run 64-bit Windows? and
- Experience unreliable communication with version 6.x, esp. when using a low baud rate.
Computer processors reported as unreliable with USB driver 6.x
- Intel Core i3
- Intel Core i5
- Intel Core i7
- AMD Phenom II X4
- system included USB 1.x controller
- problematic on firmware updates only
- fixed with driver 4.4
We have signed and posted legacy driver 4.4 as an interim measure. The driver provider (a third party) is aware of the unreliable communication issue and is currently working to resolve it.
The communication problem appears to affect all recent computers with Intel Core i3/i5/i7 processors whose motherboards lack an onboard USB 1.x controller and instead include a USB 2.0 rate-matching hub. If you cannot find a "Universal" or "Open" host controller in Device Manager under the "Universal Serial Bus" category, you may be better off "beta testing" v4.4 rather than waiting for v6.0 to fail.
Step by Step: Driver Installation
- Download and run (double-click) the file "cp210x44.zip" from
the link above. Right-click the file and select "Extract All" to
extract the driver files.
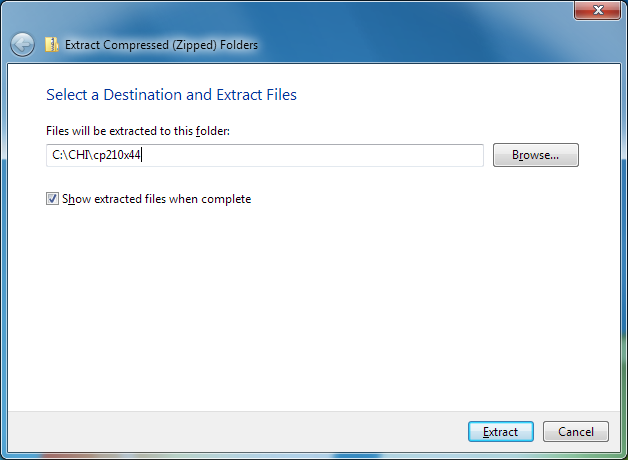
Step 1: Extract files to specified directory (C:\CHI\cp210x44 in the example above).
- Connect the instrument to a USB port on your computer and
turn the instrument on. Ignore and close any windows that appear
automatically.
Note: If during this step Windows Update insists on automatically installing a different driver version (6.x or higher), you will need to uninstall this driver manually as follows:- Open Device Manager as in Step 3.
- Locate the "CP2101" device as in Step 4.
- (Optional) Determine the currently installed driver version as in Step 10 to be 6.x or higher.
- Right-click on the device and select Uninstall.
- In the "Confirm Device Uninstall" dialog box, check "Delete the driver software for this device" and click OK.
- Disconnect your computer from the internet.
- Disconnect and reconnect the instrument to your
computer.
This should prevent automatic installation of Silicon Labs driver version 6.x, which has been found to be problematic with newer Intel Core i3/i5/i7 motherboards.
- Click the Start orb in the lower-left corner of your desktop
and type "device" in the search field. Click on Device Manager
in the search results.
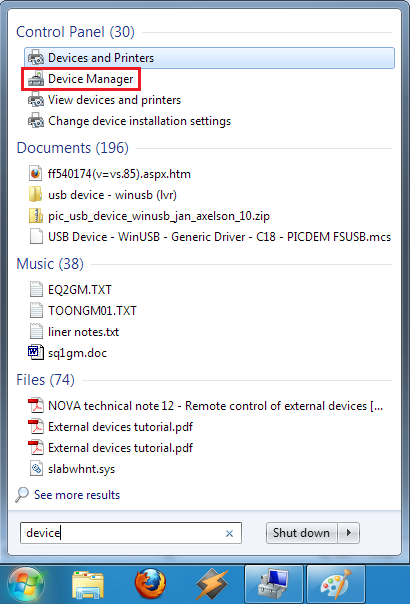
Step 3: Open Device Manager.
- In Device Manager, double-click on a device marked with a
exclamation mark and named "CP2101 USB to UART Bridge
Controller" or something similar; this should be located under
the "Other devices" or "Universal Serial Bus" category.
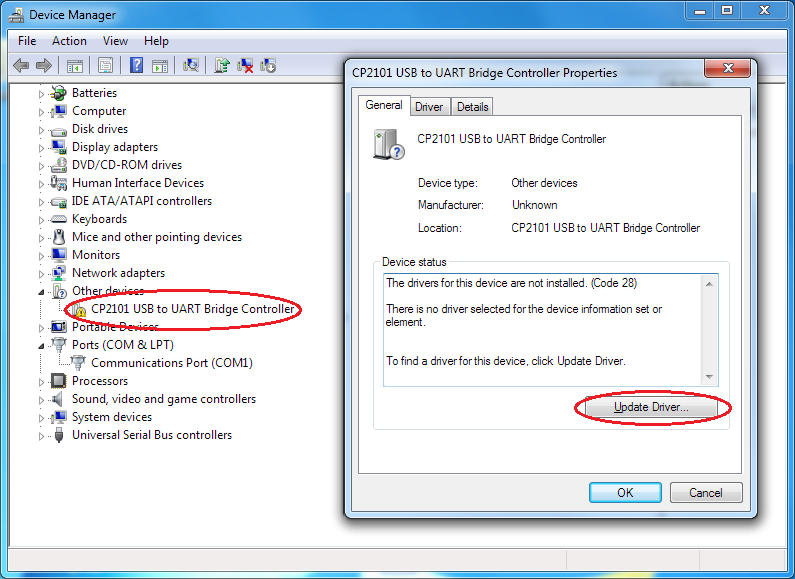
Step 4: Locate and double-click on CP2101 device.
Click the Update Driver button circled above.
- Select "Browse my computer for driver software".
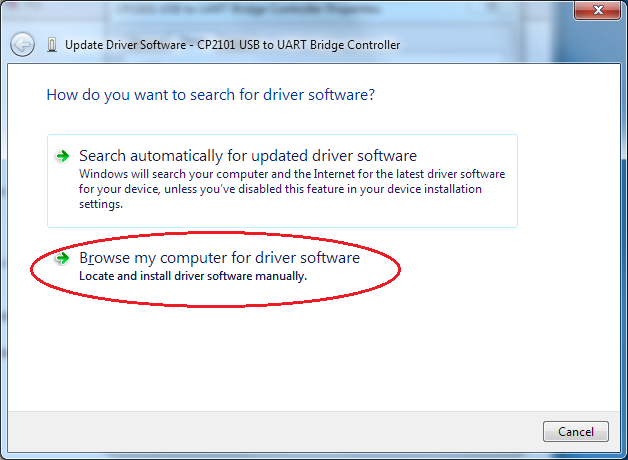
Step 5: Do not search automatically for drivers.
- Specify the extraction directory from Step 1 and click Next.
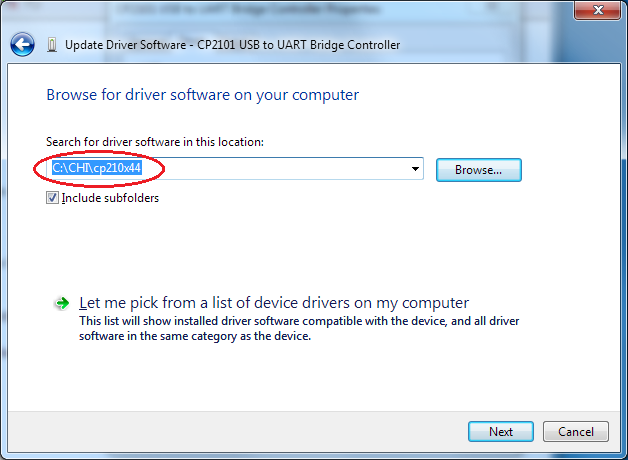
Step 6: Search for drivers in the extraction directory from Step 1 (C:\CHI\cp210x44 in the example above).
- Click Install when presented with a security warning.
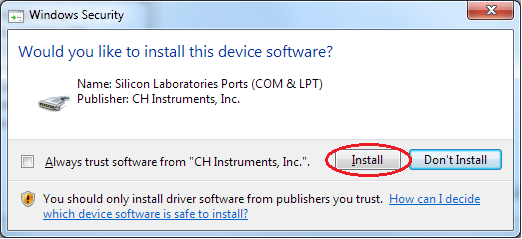
Step 7: Trust CH Instruments, Inc. as a publisher.
Silicon Labs wrote the driver; all we (CH Instruments) did was sign it (i.e., vouch for it; see Notes).
- Windows will now proceed to install driver files, resulting
in the following window when complete:
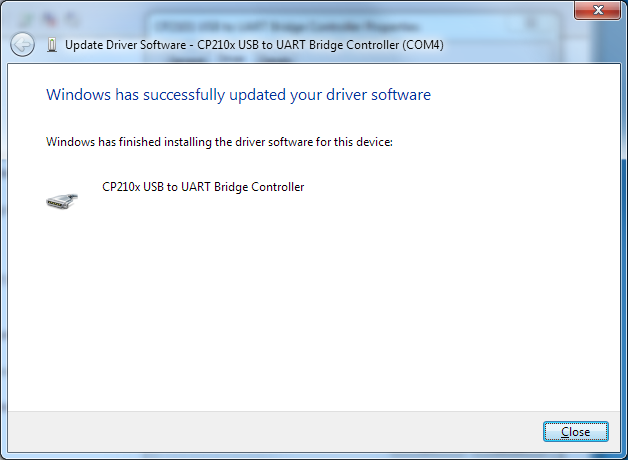
Step 8: Driver files installed.
- Repeat Steps 4-8 until the "CP2101 USB to UART Bridge
Controller" device no longer shows up with an exclamation mark:
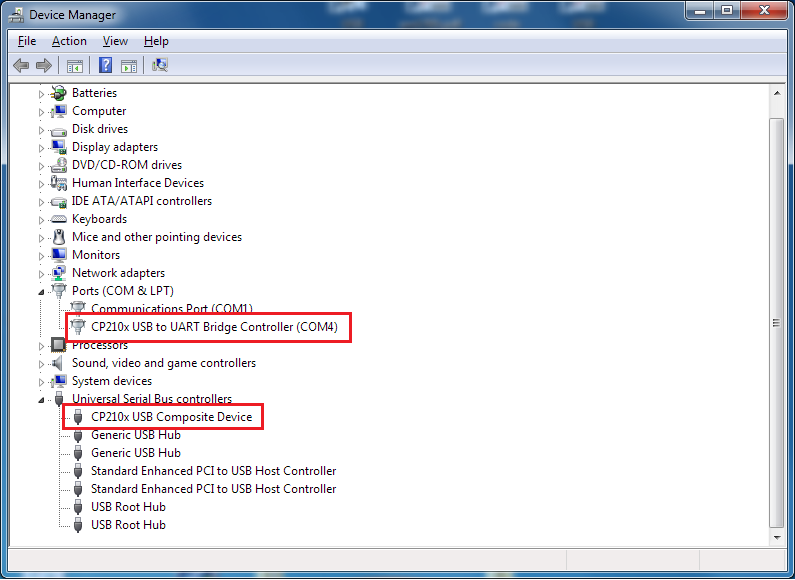
Step 9: Driver installation complete.
Two new devices should now be present in Device Manager: a "CP210x USB to UART Bridge Controller" under "Ports (COM & LPT)", and a "USB Composite Device" under "Universal Serial Bus controllers".
- Double-click on the "CP210x USB to UART Bridge Controller"
device under "Ports (COM & LPT)" and verify that USB driver v4.4
is installed, working correctly, and signed by CH Instruments.
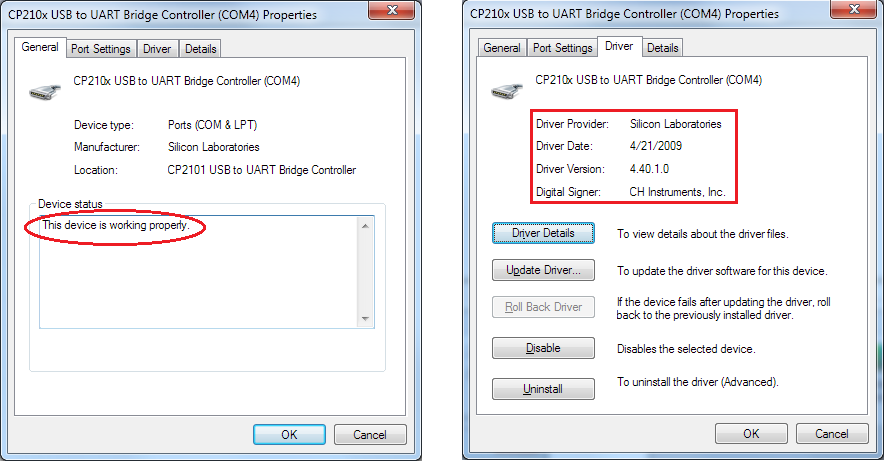
Step 10: Verify driver status.
This completes driver installation. Take note of the COM port number (COM4 in the example above). Assign this number in your instrument software, using the System command under the Setup menu, and then run the Hardware Test command under the Setup menu to confirm that the instrument and computer are communicating properly.
Notes
- The USB driver needs to be installed only once on your computer. Multiple instruments can be connected to the same computer, and Windows automatically assign them to different COM ports.
- The COM port number assigned to your instrument may vary from computer to computer, or even on the same computer (rarely).
- You can double-click on the "CP210x USB to UART Bridge Controller" item in Device Manager to display various status information: driver version number, whether the driver is functioning correctly, etc.
- USB communication is achieved using a USB-serial port
converter chip built into the instrument; the driver for this
chip, courtesy of Silicon Labs, is what is installed in this
section.
- As a result, the instrument software will behave as if this device is connected to a serial port, even though the physical connection is by USB. Thus, you need to use Device Manager as described above to determine what serial port number is assigned to this device.
- USB communication therefore provides no specific advantages over a native serial port besides the difference in physical connectivity; if you have a free serial port available on your PC, we recommend its use over a USB port.
- We include USB support because most computers sold today lack an onboard serial port, and it may be impractical or impossible to add a serial port card.
- Silicon Labs' old 32-bit drivers from 2003 (version 4.16) have been thoroughly tested with our instruments and have been found to be very reliable. However, they are not compatible with 64-bit versions of Windows.
- Silicon Labs' newer drivers (version 6.x) are 64-bit compatible, but unfortunately these newer drivers have been found to be unreliable on both 32-bit and 64-bit operating systems when using slow baud rates (19.2K and lower). Whether they will work correctly on your computer will depend on your particular hardware. These are closed-source third-party drivers, over which CH Instruments, Inc. has no control. We apologize for any inconvenience and strongly recommend the use of driver version 4.16 on any 32-bit version of Windows, including Windows 7.
- More recently, we have posted Silicon Labs' USB driver version 4.4 as an interim measure. Version 4.4 is compatible with 64-bit Windows, and does not seem to suffer from the slow baud rate problem mentioned above. However, we have only tested version 4.4 briefly, and we are unsure whether it is more reliable than 4.16 (which is 32-bit only). We do not intend version 4.4 to be a permanent replacement for version 6.x; Silicon Labs is aware of the 6.x issue and is working to resolve it.
- Microsoft has only started requiring signed drivers in
64-bit Windows. Contrary to popular belief, however, 64-bit
Windows only requires that a driver is signed with a
verified certificate, which is not the same as having it vetted
by Microsoft's WHQL program. Thus, the driver signing
requirement does not necessarily increase stability or security,
which is all we end users really care about. Case in point:
Silicon Labs' driver 6.0 is WHQL-certified and thus does not
elicit any "untrusted publisher" warnings when installed;
however, this driver is known to suffer from serious stability
issues (BSOD on surprise removal). On the other hand, we signed
Silicon Labs' version 4.4 with a simple (verified) Authenticode
code signing certificate, bypassing WHQL entirely (but of course
forfeiting any hope of obtaining the coveted "Certified for
Windows" logo).
What this all means is that 64-bit Windows will allow you to install a driver if and only if somebody vouches for it, nothing more and nothing less. If you have any questions or corrections, please contact us.